I recently had a chat with my team about how redirects are handled. Coming away from the discussion I realised that there is a lot of assumed knowledge around the subject. As a result, some of the subtleties of redirects can be lost. This can potentially lead to issues impacting the user experience and SEO results that the redirects were originally set up to improve.
What is a redirect
A redirect is an instruction we give a web browser, search engine or other client to send a user from one resource/URL to another. It can be either permanent or temporary; the importance of which we will cover in a bit.
Why do we want to redirect
Redirects are usually a fundamental part of a web application. They're used for many reasons. These include URL canonicalisation, handling broken links, user authentication and form submissions.
URL canonicalisation ensures search engines and users consistently use a single canonical URL for a resource. This helps with SEO as it reduces perceived duplicate content where the same page can be accessed via multiple URLs. For example, a page may be accessible via both 'http' and 'https', or with or without a 'www' subdomain.
Where we have broken links, redirects improve the user experience by ensuring they are served the relevant content rather than being given a 404 missing page error. This is also helpful for SEO as broken links can harm search rankings.
If an application has restricted content, we can use redirects to forward an unauthenticated user to a login page; and then redirect the user back to the content they were attempting to access after a successful login.
Redirects are also commonly used after a successful form submission to send the user to the next step of a process. For example, on an e-commerce site a redirect may be used to forward a user to a basket page after adding an item to their order.
Server status codes
When a server sends a HTTP response, it includes a three-digit code indicating the outcome of a client's request (e.g. the request made by a web browser).
Redirect responses are indicated by a status code starting with a '3'. The two most commonly used/seen for redirects are:
- 301 Moved Permanently
- 302 Temporary Redirect
You will also come across the following status codes:
- 307 Temporary Redirect
- 308 Permanent Redirect
These work similiarly to 301 and 302. However, 307 and 308 guarantee that the method and the body will not be changed when the redirected request is made. Some old clients would incorrectly alter the original request method to a get which for a post request would result in a loss of posted data.
Temporary versus permanent redirects
It's important to understand the difference between temporary and permanent redirects. They will affect the user experience and have an SEO impact.
Temporary redirects
Temporary redirects return a 302 (or 307) status code. This tells the web browser, or search engine, that it is only a temporary redirect and that the original URL may be used again in future without redirecting. Web browsers and search engines should continue to store and use the original URL.
Temporary redirects are like the traffic diversions created when a street is closed for roadworks. Once the works are complete, traffic can continue down the original route.
Permanent redirects
If a permanent redirect is returned using a 301 (or 308) status code, the web browser or search engine are being instructed that the original URL is no longer in use.
Permanent redirects are like moving house and telling people of your new address. You won't be returning to your old home, so you want mail and visitors to all go to your new place.
For permanent redirects, web browsers (and other clients) will cache the redirect response and handle it without contacting the server until the local cache expires. This is important to note. If the redirects get incorrectly configured, or need changing, anyone who has a cached version of the original redirect rules will not see the new rules until their cache expires. How long a browser, search engine or other client caches redirects varies per user.

How do we redirect
There are two approaches to handling redirects:
- Server-level redirects
- Code-based redirects
Server-level redirects
Server-level redirects are defined in the server's config files and are handled before any application code is run. We typically use this type of redirect for handling things like broken links, enforcing HTTPS and handling www/non-www URL preferences.
Here's an example of a server-level redirect for Nginx.
rewrite ^/blog/?$ https://example.com/news permanent;
In this example 'blog' will permanently redirect to 'news'. Note that we can use regex here.
Code-based redirects
Code-based redirects are defined within the application's code. This often gives us more dynamic control over the redirects. Common uses include handling user authentication, form submissions and dynamic navigation.
Code-based redirects will be slower than server-level redirects as the application code needs to run before the redirect is triggered. It is therefore best to configure redirects at the server-level where appropriate. This not only keeps things fast, but also reduces the load on the server.
The server-level example given above could technically be handled at the code level. However, the server would need to do more work to get to the defined redirect.
Where we want to use code-based redirects is for things that are application specific. For example, if a form has successfully been processed we may need to redirect to a different URL. Here's an example of that using Laravel to redirect to a defined route.
return redirect()->route('basket');
The Laravel code above is an example of handling a redirect from an application's backend code. Laravel's redirect function sets the response headers for a redirect. By default it uses a 302 status code (it's possible to change this). We can also trigger redirects from the frontend.
Here's an example of a JavaScript redirect.
window.location.href = '/dashboard';
URL canonicalisation
I've already mentioned URL canonicalisation as a reason for writing redirect rules, but wanted to expand on it here; I have found it to be an area of confusion for some developers and can be a forgotten part of setting up a new website.
A canonical URL is the authoritative version of a web page when multiple URLs contain similar or duplicate content. By defining these it helps search engines understand which URL should be indexed and displayed in search results. They help avoid duplicate content being found on different URLs which can have a negative impact on SEO.
We can define canonical URLs in our HTML using a meta tag.
<link rel="canonical" href="https://example.com/about" />
This is a useful approach. However, we should still enforce URL canonicalisation through permanent redirects where possible.
Let's consider some of the possible ways our content can be reached via multiple URLs and how we can resolve them to a single URL via redirects.
http and https protocols
One of the most common permanent redirects that gets set up is one to redirect from http to https.
In Nginx this is easily achieved by checking the protocol used in the request and redirecting to https where needed.
if ($http_x_forwarded_proto != 'https') {
  rewrite ^ https://example.com$request_uri permanent;
}
Different domains and subdomains
In the early days of the web, it was common to use the 'www' subdomain for websites. This was to distinguish from other uses of the domain on the Internet, such as FTP and email servers that predated the World Wide Web. Nowadays, the use of 'www' has declined and it is common to allow people to access a website with or without it. However, this means we end up with two URLs for the same site, e.g. 'example.com' and 'www.example.com'.
Similarly, other domains and subdomains can be set up as aliases of the primary domain.
In Nginx we can handle these different domains and subdomains by checking if $http_host is the primary domain; if not, we rewrite the URL to use our authorative main domain.
if ($http_host != 'example.com') {
  rewrite ^ https://example.com$request_uri permanent;
}
Trailing forward-slashes
It may sound trivial, but whether or not there is a trailing forward-slash at the end of the URL can be interpretted as different URLs. For example, 'example.com/blog' and 'example.com/blog/' are different URLs. Although uncommon, it is possible for these two URLs to serve different content (I've frustratingly discovered this on some sites).
To ensure URLs are canonical we want to establish a consistent approach as to whether or not our URLs end with a forward-slash. Personally, I like to remove the trailing slashes which can be done in Nginx with a simple rewrite rule.
rewrite ^/(.*)/+$ https://example.com/$1 permanent;
Chaining
One thing to be aware of, and definitely be testing for, is redirect-chaining. This is where multiple redirects are triggered in a row. It is especially important to be aware of this when dealing with server-level redirects where we are often setting multiple rules to handle canonical URLs and broken links.
Redirect-chaining is a bit like getting lost in an Ikea store. You might find yourself in Textiles looking to get to Lighting. You can follow the store arrows which will take you on a long trek through the multiple departments; or, you could just take the less obvious shortcut that takes you straight from your current location to Lighting.
Server redirects are similar. The order in which the rules are defined is important. It can make the difference of the client making multiple requests to the server to get to the end URL, to the client just needing to make one call. The latter is clearly preferable.
Let's look at an example of a set of Nginx redirect rules that can result in a redirect chain.
# Redirect to https (a)
if ($http_x_forwarded_proto != 'https') {
  rewrite ^ https://example.com$request_uri permanent;
}
# Redirect to primary domain (b)
if ($http_host != 'example.com') {
  rewrite ^ https://example.com$request_uri permanent;
}
# Remove trailing slashes (c)
rewrite ^/(.*)/+$ https://example.com/$1 permanent;
# Resource specific redirect (d)
rewrite ^/blog/?$    https://example.com/news permanent;
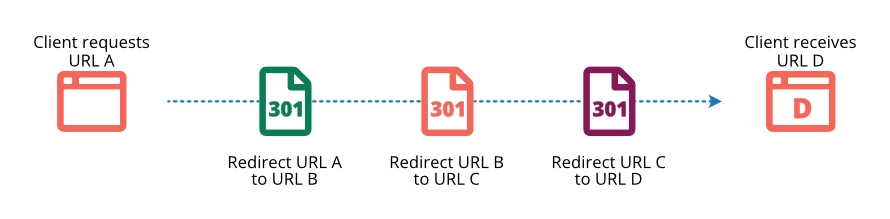
Imagine we were to make a server request for the URL 'http://www.example.com/blog/' with the above configuration. The following chain of redirects would happen:
- 'http://www.example.com/blog/' redirects to 'https://example.com/blog/' (rule 'a')
- 'https://example.com/blog/' redirects to 'https://example.com/blog' (rule 'c')
- 'https://example.com/blog' redirects to 'https://example.com/news' (rule 'd')
Rule 'b' is skipped because rule 'a' corrected the primary domain at the same time as fixing the protocol. Had we requested the URL 'https://www.example.com/blog/', rule 'a' would have been skipped and rule 'b' triggered instead. Either way, our initial requests are triggering a chain of three redirects.
Now, if we re-order those rules so that the more specific rules come first and the more generic ones last we can eliminate the chain.
# Resource specific redirect (d)
rewrite ^/blog/?$    https://example.com/news permanent;
# Remove trailing slashes (c)
rewrite ^/(.*)/+$ https://example.com/$1 permanent;
# Redirect to https (a)
if ($http_x_forwarded_proto != 'https') {
  rewrite ^ https://example.com$request_uri permanent;
}
# Redirect to primary domain (b)
if ($http_host != 'example.com') {
  rewrite ^ https://example.com$request_uri permanent;
}
Requesting 'http://www.example.com/blog/' would trigger rule 'd' first and redirect us to the final URL. Similarly for 'https://www.example.com/blog/'.
Redirect loop
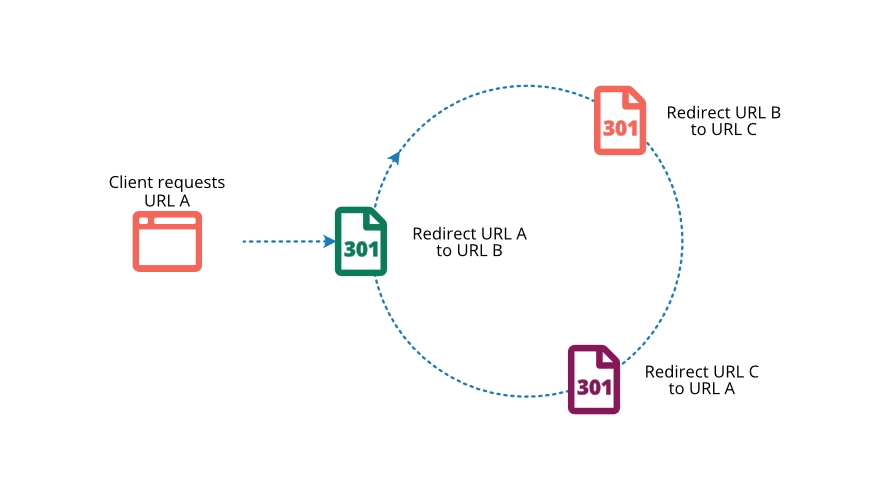
A redirect-loop is a closed redirect-chain. This is where the redirect rules loop back on themselves causing an infinite number of redirects. Unlike a normal redirect-chain that will eventually resolve to a final URL, a loop will eventually cause a timeout error.
We need to be mindful of loops when setting up redirects and test that they do not occur.
Consider the following Nginx configuration.
rewrite ^/blog/?$    https://example.com/articles permanent;
rewrite ^/articles/?$    https://example.com/news permanent;
rewrite ^/news/?$    https://example.com/blog permanent;
These will create an infinite redirect loop.
- 'https://example.com/blog' redirects to 'https://example.com/articles'
- 'https://example.com/articles' then redirects to 'https://example.com/news'
- 'https://example.com/news' redirects back to the original URL 'https://example.com/blog' and the loop continues
It's important that we check when adding new redirect rules that they resolve to a final URL and don't get stuck in a loop like this. When the number of defined redirects grows, it becomes increasingly easier to introduce undesired loops. Always test your redirects as you add them to avoid issues like this.
Summary
Redirects can be used to enhance the user-experience and improve SEO. We can define both permanent (301) and temporary (302) redirects. Permanent redirects are great for things like URL canonicalisation and handling broken links. Temporary redirects are useful for user authentication and form submissions.
It's hugely important that we remember permanent redirects get cached locally, so testing redirects before they go live is essential. It's also important to test for redirect-chaining as this can impact search rankings.